Tag Archives: clothing care

Iron

How To Iron A Crease In Pants

Iron

Nothing looks crisper than a properly pressed pair of pants. Nothing is more evident of a lack of attention to detail than poorly pressed pants that have multiple creases. Knowing how to iron a crease in pants is an art that is becoming increasingly lost as more and more people opt for wash and wear. If you want to appear nicely pulled together and professional, without spending a fortune on dry cleaning, you need to learn the proper way to iron a crease in pants.

The first thing you need to do is make sure you have the right tools. It is very important that you have a firm flat surface on which to do your ironing. A soft bed is not going to work well. Ironing boards are a great tool to have in your home if you plan to do any amount of ironing. If not, you can use the floor or a cleared kitchen counter top. Just be sure to pad the area with clean linen that you have pressed to ensure that no wrinkles are transferred from the padding to the clothes you are ironing.

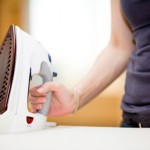
You should also have a steam iron as a dry iron often does not give as good a finished result. Spray starch may be needed if you have fabric that is not holding its shape well or if you prefer a stiffer appearance to your clothes. The last piece of equipment you need is a pressing cloth, which is typically a fine piece of white fabric to be put between the iron and the pants to avoid scorching or discoloration of certain fabrics from the direct heat.

Before you begin actually pressing the pants, you will need to lay them properly on the ironing surface. Hold the ends of the pants together with the seams touching each other. This will create a natural crease in the middle of the front of the leg and the back of the leg. This is exactly what you want to iron. Lay the pants on the table exactly as you have lined up the seams.

Place the pressing cloth on the portion of the leg that is showing and pass your hot iron on the steam setting over the pressing cloth. Pay close attention to holding the iron down longer than usual at the crease to create a crisp line. Move the pressing cloth as needed. When the top portion is done, which is actually the exterior side of one leg, lift that leg gently and place it out of the way so you can iron the inner part of the other pants leg. Again use the pressing cloth as you go.

When you have completed that section, pick up the pair of pants and turn them over so that the unironed exterior part of the second leg is now on top. Repeat the process as you did before. You may also need to lay the pants flat to iron the waistband and pockets, but this will not affect the great crease you have created in your pants. An alternate method is to use a steamer to press your clothes in which case you can often create a crease in pants while they are hanging.

Now that you know how to iron a crease in pants, you are equipped to make your wardrobe look like it has been professionally dry cleaned, without the cost of doing so.

Swimsuit

How to Properly Care For Your Swimsuit

Swimsuit

Regardless of how you treat it, your swimsuit gets a lot of rough treatment. It soaks in chlorinated water for long periods of time. Abrasive sand rubs the delicate fibers. Harsh chemicals, oils and colors from sunscreen products are smeared on your swimsuit. It is exposed to hours of bleaching sunlight almost every time you wear it. This is typical abuse of a swimsuit by those who are careful. However many people do worse by not washing their suits after each use, throwing them in a hot clothes dryer and other abuses. Knowing how to properly care for your swimsuit will ensure you get as much use as possible from yours.

Every time, without fail, when you are finished using your swimsuit, you should wash it out. Treat it like you would underwear. You certainly wouldn’t wear underwear a second time without washing it and swimsuits should get the same treatment. In fact, if you are swimming in a chlorinated pool or hot tub, you should hand rinse the suit as soon as you take it off to get as much chlorine out of it as possible if you cannot get it to a washer right away.

It is important to hand wash or use your washer’s gentlest cycle to wash your swimsuit. The fabric used in swimsuits is delicate and can easily get damaged when thrown in a regular wash cycle. Another thing to avoid is washing your suit with towels or jeans. The suit should be washed alone or with other swimsuits which do not have metallic additions on them. This is to prevent unnecessary damage.

Use a detergent that is formulated for delicates when washing your swimsuit. Such detergents are designed to work well in cold water, which you should be using to launder your suit. Make sure all the detergent has been thoroughly rinsed out, as residual detergent in swimsuits makes bubbles in pools and hot tubs.

When your swimsuit is adequately rinsed, roll it in a dry towel and squeeze gently to remove excess water. Then lay flat to dry. You may also hang your suit to dry if it is of a material that will not stretch. Be sure to get it as dry as possible with the towel before hanging it.

When the suit is dry, store it flat in a drawer until the next time you need it again. Hanging a swimsuit for extended periods of time is not advised. Some other things to avoid in the care of your swimsuit include the following. Never leave your wet swimsuit on the floor or in a bag for an extended period of time. Mold may grow on it and ruin the suit. Never throw your swimsuit in a hot dryer. It will compromise the material in your suit.

By properly caring for your swimsuit, you can get multiple seasons of enjoyment out of it. Learn what to do and what not to do to keep it in the best shape possible.

Curry stains

How To Remove Curry Stains

Curry stains

Curry is a wonderful unique spice that is typically found in Indian dishes. More and more it is becoming a widely used spice throughout the Western World also. An enticing combination of sweet and spicy, curry has an unmistakable taste that people either love or hate. The more curry you use in your cooking the spicier the taste becomes. It also turns dishes an unmistakable shade of yellow. In addition, if you happen to drop some curry spiced food onto clothing, it leaves a distinct yellow stain. Make sure you act quickly if you want to prevent that curry stain from becoming a permanent one.

Immediately rinse the stain in lukewarm running water to minimize the damage. You will see the stain rinsing through. Keep the stained fabric in the running water until no more stain reduction can be observed. The next step is the pre-treatment of the stain itself. If you have an item which can be washed in chlorine bleach, apply some of the bleach directly to the stain and wash the item in a protein-based detergent as usual and the stain should be gone.

For clothing that cannot be treated with chlorine bleach, alternate methods must be used. Delicate fabrics and colored clothing that have curry stains should be treated with a half and half mixture of glycerin and warm water. Put the mixture on the stain and work it in. Let it sit for 10 to 30 minutes before you wash it in an enzyme-based laundry detergent.

For stubborn stains, big stains, set in ones or stains on rugged fabrics, a solution of hydrogen peroxide and water is just what is needed. You can dilute the peroxide in water in a 1 to 6 proportion to a 1 to 9 proportion. Try the solution on a hidden part of the garment before using it on the stain to check for color fastness. Once you are satisfied that this bleaching solution will not harm your article of clothing, soak the article in the solution for several hours. Check on the progress of the stain regularly and when you see that it is dissolved, remove the item from the solution and rinse it before washing it in an enzyme based detergent.

As you are working at removing a curry stain one thing to keep in mind is to never dry the item before the stain is completely gone. If you pre-treat the stain and wash it in the washer, be sure to check that the stain is actually out before you proceed with drying it. If not, you will have set the stain into the fabric. However if you catch it while the item is still wet you can do a second treatment and wash using the same method or a different one.

If worse comes to worse and you find that you cannot remove a curry stain from an item of clothing, don’t be too disheartened. Just designate that item as your official curry making and eating clothes and be sure to wear it whenever you are at risk for further curry stains.

Smelly shoes

How To Clean Smelly Shoes

Smelly shoes

So why do feet smell so bad? It’s an age-old question. The answer is probably obvious. What might not be obvious is how to clean the smelly shoes that are caused by bad-smelling feet.

Feet contain hundreds of thousands of sweat glands. This is normal in all people. Sweat is basically just salt and water, and doesn’t have much of a smell of its own. The smell is actually caused by bacteria. Sweat attracts bacteria and is their source of food. These millions of bacteria eat the sweat and then excrete it out. The bacterial excretion causes the pungent smells we’re so familiar with.

Actually, hands have nearly as many sweat glands as feet but don’t smell as badly. So what gives? The reason is our socks and shoes. The sweat from our feet can’t easily escape into the air like the sweat our hands excretes. Bacteria love the dark, damp confines of sweaty shoes and have a feeding frenzy. When you remove your kickers at the end of the day, the smell that hits you is all of that collected bacterial waste.

An obvious way to keep shoes from smelling is to keep your feet clean in the first place. Be sure to dry your feet completely after bathing and add a moisture-wicking powder between the toes. Wear socks like cotton or bamboo that are great at absorbing sweat and change them a couple of times throughout the day. Make sure your shoes are not overly tight which is another way to stimulate sweat to build up. Finally, go barefoot and let your feet air-out as much as possible. If you can, put your shoes on a rotation. That is, try to switch to another pair so that previous pair can air out before you wear it again.

Ok so what if you’re too late in cleaning your own feet and simply have shoes that you can barely stand to be in the same room with? There are numerous ways to rid those old, or sometimes barely-worn shoes of the odors they accumulate. Some methods are backed by sound science while others are Grandmother’s old ways that she swears does the trick. Whether you’re inclined towards modern science or old wives-tale methods, try one of these ideas on for size.

1)  A combination of anti-bacterial spray and anti-fungal foot powder. There are various sprays and powders on the market that should work well. One to try is Fresh Wave.

2)  Cedarsoles (insoles made from antifungal cedarwood) have an easy long-lasting effect.

3)  Place each shoe into a plastic bag and place into a freezer overnight. The next day remove from the bag and freezer. Place the shoes outside in the sunlight to thaw, and dry.

4)  Place cat litter into a pair of tights. Tie the tights securely and place in each shoe overnight. The shoes will be odorless the following morning. You will need to change the cat litter periodically. It works, cost is minimal and environmentally friendly!

5)  Remove the laces and soles from your shoes and put them all in a single pillow cushion. Put a small towel in there too and then put on a single 40 or 50 degree wash. repeat this procedure again immediately after the first time.

6)  Put rubbing alcohol on a cotton square and wipe out the insides of the shoes that are not washable.

Now go take care of those shoes before they take on a life of their own!

Gas stains

How to Clean Gas Out of Cloths

Gas stains

You are in a rush and late for an appointment. You swing into the gas station and begin to fuel your vehicle up. When you are done you whip out the nozzle only to find that the gasoline was not finished going into the tank. The result is you and your clothing being soaked in gasoline. While all you have to do is take a shower to get rid of the gasoline smell, how do you get it out of your clothing?

There is perhaps no harder smell to get out of cloths and for this reason many individuals simply throw out their gas soaked garments. Before you give up though, here are some steps to take to help you rid your cloths of gasoline:

•    Pre-soak: First take the cloths off and completely soak them in warm water and then ring them dry as best you can.

•    Sunshine: Lay the cloths that are soaked with gasoline out to dry in the sun. This will completely dry the cloths and the sun and fresh air will help to start the smell of the gasoline to dissipate.

•    Soak clothing:
Next mix warm water with some vinegar and swash the clothing around in it. Make sure you agitate the material of the clothing well so that the vinegar can penetrate the gasoline and do its job. Let the cloths sit in the solution for about 20 minutes. Take them out of the solution and put them back in the sun to dry.

•    Soak again:
Mix another solution of warm water and this time use Dawn liquid detergent. In addition to putting the Dawn in the water, put it directly on the spots where the gasoline soaked the garment and rub it in. Then swash the cloths in the solution and let it sit for an additional 20 minutes. Take the clothing out of the solution and once again put them in the sun to dry.

•    Use baby oil: Since gasoline is an oil based product, it will need the help of an oil based product to get it out of your cloths. Put your gasoline stained cloths in the washer and use regular detergent and top it off with a small amount of baby oil. Be sure you are only washing the gas laden cloths and nothing else.

•    Sunshine again:
You guessed it, more sunshine. Because the baby oil will be in the clothing now, you will want to set the cloths back out into the sun and let them dry. If you put an oil based product in the dryer you could be risking a fire. You will have to wash the cloths several more times before the baby oil is completely gone.

•    Repeat: For tougher gasoline stains, you may have to repeat this process a couple of times.

While it is a lengthy process it does in fact work. At the very least it is worth a shot before you just throw away cloths that are perfectly fine and can be saved.

Dry fast

The Fastest Way to Dry a Shirt

Dry fast

Isn’t it always the worst possible time, when you are in a rush to get out the door, that you discover your favorite shirt, your work shirt, or the shirt that is perfect for the occasion that you are heading to is still in the washer dripping wet! Those kinds of moments seem to happen way too often. However, if you know the trick to quickly drying a shirt, you will never have to sweat it again while your tee takes its time drying.

Much debate is held about the ideal way to dry clothing. Some people advocate hanging clothes to dry only, in order to avoid shrinkage and color fading. Others love the wrinkle-free softness that only a clothes dryer can deliver. When speed is what you are looking for in clothes drying, an electric or gas dryer is the way to go.

Before you even begin to officially dry your shirt in the dryer, make sure it is as dry as it can be so you don’t overtax your clothes dryer. It will also speed up the process if it is dryer. Put the shirt through an extra spin cycle in the washing machine, in order to spin out as much excess water as possible. You can also lay your shirt flat on a dry towel and then roll up the towel and shirt together in a jelly roll fashion. Squeeze the rolled up towel/tee combination to get rid of extra humidity.

Then, you will need to put it into the dryer inside out, with another dry towel. The towel will help to absorb some more of the moisture in your shirt. Alone, except for the towel, the shirt will not be competing for other wet clothes for heat or air and will dry amazingly quickly. Use the highest heat setting recommended on the care tag of the shirt.

When selecting a towel to go in the dryer with your tee, remember to choose one that is the same color as your shirt or there may be unwanted color transference. The towel may also transfer a little lint onto the shirt, so if it is in the same color as the shirt, it is less noticeable. (Use a lint brush before you wear it though.) Be sure to dry your shirt inside out because it will protect the exterior of the shirt from developing pills from the friction of rubbing against the towel. Drying it this way also minimizes the appearance of lint.

Another trick for those people who seem to get stuck needing to dry a shirt quickly often is to get a backup shirt. Having another duplicate shirt on hand when you are in a rush to get to work or when you want to go somewhere in your favorite shirt is the ideal solution. Just make sure that one is always clean and you’ll never again have the problem of trying to dry a shirt as fast as possible anymore.

Static cling

What Is Static Cling?

Static cling

Putting on an item of clothing to find out that it is full of static cling is so annoying. It inevitably happens when you don’t have time to deal with the problem or the clothes affected by it are the ideal choice for the day or the occasion. Static cling is so annoying because the more you pull the item away from you, the stronger it clings. Knowing what static cling is, how to prevent it and how to get rid of it will keep it from ever being a problem again.

Static cling is an electric attraction created by two items when there is low humidity. When the items rub together, a transference of electrons occurs. When this happens one of the items becomes positively charged and the other becomes negatively charged. In this situation the items adhere to each other. Typically it is the lighter weight object which adheres to the heavier one. It is a very common problem for clothes which are dried in a clothes dryer, especially during winter months when humidity is low.

You can prevent static cling in a variety of ways. You can use fabric softener liquid in the wash or a fabric softener sheet in the dryer to get rid of static cling. It creates a chemical buildup on the clothes which prevents it from rubbing together and forming static cling. This is the most common way of dealing with static cling in the Western world, however as more and more people are becoming concerned with the use of chemicals in their daily lives, interest in alternative methods has risen.

For a more natural method of preventing static cling, you simply add a cup of vinegar to the rinse of your laundry. Of course, keeping the humidity up in your home will also help you to reduce the occurrences of static cling that you deal with because static electricity cannot thrive in conditions that are not dry. You should also remove clothing from the dryer before it is completely dry and hang it to finish drying. Another tip is to avoid synthetic clothes which tend to have many more static problems. Natural fiber clothing like cotton is much better in terms of static. Hanging your clothes outside to dry when possible is another way to help reduce the chance of getting static cling.

There are also static reducing sprays on the market that allow you to treat an item that you want to wear immediately. Another quick fix when time is of the essence is to rub a fabric softener sheet inside your clothes until the static cling is gone. Spraying a mist of water in the air and walking through it to get rid of static cling is another great, quick remedy. This one may not be the most long lasting method though and may need to be repeated throughout the day.

Static cling happens to everyone at one point or another. These tips should arm you with the knowledge to prevent it as much as possible and deal with it when it shows itself.

New t-shirt

Why Are New T-shirts So Stiff?

New t-shirt

Whenever you buy new clothing, there always seems to be a strange feeling to the fabric. It tends to very stiff and uncomfortable to wear. This is one of the reasons that many people swear by the fact that T-shirts must be washed prior to use. Once washed the same T-shirt tends to be soft, yielding and relaxed. It is like a totally different shirt. This is often simply because the cotton fibers in the garment have had a chance to relax in the water and return to their natural state after all the stress of production.

Additionally, can be a buildup of excess chemicals on the new T-shirts that may cause them to feel very stiff to the touch. Unless you opt for organic cotton, your T-shirt may have been covered in chemicals even from before it was made. Cotton is one of the crops that receives the most chemical treatments of all. Therefore even in the growing stage the cotton was getting chemicals.

In the plant where it was made into thread and then fabric, it was again treated with chemicals. Again during the sewing process, even more chemicals may have been added to make a shiny appearance and other chemicals were put on it before the item was pressed. Excess dye was used and remained on the garments after purchase. Therefore all these things accumulated to create a rather stiff final product.

By opting for certain types of T-shirts you will not have to deal with the initial stiffness of T-shirts that are so uncomfortable. Combed ring spun cotton is exceptionally soft and is a great choice for a T-shirt you plan to have printed. When opting for this type of T-shirt, remember that it will probably be slightly stiffer than it will be after that first wash but it is much softer than comparable tees.

If you find that your T-shirts are too stiff, opt for pre-washed cotton tees that are custom-made. You will get to choose the fabric, the style, color, fit and design. You can create a perfect T-shirt that you will look forward to wearing time after time, because it is so totally you. Choose to put a favorite photo, drawing or other image on a T-shirt. You can instead print a cool line that is typically you, like a joke, a clever one-liner, something sarcastic or something you feel strongly about. You can choose to educate others with a T-shirt full of information. You also have the option of stating your pride about something or supporting a cause.

Washing machine

Tips for Using a Washing Machine

Washing machine

A washing machine is one of those appliances that is essential to keeping a household running smoothly. If yours breaks down, you quickly gain an understanding of just how much work this underappreciated piece of machinery does. That’s why it’s important to take care of your washer by using it correctly, and by performing some occasional maintenance to keep it in top operating condition. Taking care of your washer now will certainly save you a lot of hassles, not to mention expensive repair or replacement costs down the road.

One of the most important considerations when using your washing machine is capacity. Capacity refers to the amount of laundry (in pounds) that a washing machine can properly wash. An average capacity washing machine can wash 12 to 16 pounds of laundry per load, while a larger capacity family-size model can wash as many as 20 pounds per load. If an excess amount of laundry is added, the washer will become overloaded, leading to a number of problems. Here are some indicators that you may be overloading your washing machine.

1.    Your clothes do not come out clean. If you still find noticeable stains, grime or soap residue after running a load, then there is a problem with the washing method. If this is an isolated event, double-check to be sure that you added detergent prior to starting the load. If detergent was added but items in the load are still dirty or soapy, overstuffing may be the culprit.

2.    Your washing machine overflows. Overstuffing your washing machine can cause the water to overflow, ruining items on the floor of your laundry room. If not caught in time, flooring and other major components of your home’s structure could sustain water damage.

3.    Your washing machine makes a loud, clunky noise. When you load your washing machine beyond its capacity, there is a greater chance of throwing the spinning drum out of alignment. This happens when one side of the load is heavier than the other, causing the drum to spin unevenly and make a very noticeable clunking noise. If this problem persists over a long period of time, it can lead to eventual breakdown of the machine.

To avoid overloading your washing machine, first determine the capacity of your washer. If your washer will hold 20 pounds of laundry, find the correct weight by measuring laundry into a trash bag and weighing it on a bathroom scale. This will help you to know the approximate weight of future loads as well. Next, add the recommended amount of laundry detergent. Select the desired cycle and water temperature for the load. Add the laundry, loosely stacking each item and distributing evenly to be sure the load is correctly balanced. If yours is a top-loading machine, avoid winding large items around the agitator.

Laundry that has been properly washed will be evenly damp, smell fresh and be free of suds and grime.  While it may be tempting to stuff the washer to the brim, in reality you’ll be wasting time and money because the clothes won’t get clean and you’ll have to start from scratch. Respect your washer’s capacity, and both you and it will live a much happier life.

Hot sauce stains

How to Remove Hot Sauce Stains from Clothing

Hot sauce stains

Nothing ruins the flavor of a great basket of hot wings quite like a giant splatter of hot sauce dripping down your white t-shirt. When this happens, it’s helpful to know a little about the ingredients in hot sauce and how to remove hot sauce stains.

There are countless recipes for hot sauce, with different variations found around the globe. Mexico, the United States, the West Indies, China, Thailand, Vietnam and Japan all feature unique versions of this distinctive sauce, among others. The primary ingredient in hot sauce is chili peppers. The peppers can be soaked in anything from vinegar, oil and alcohol to fruits and vegetable pulps. Other ingredients are often included to add flavor and/or heat, such as garlic or mustards.

Hot sauces vary in heat according to the types of peppers used in them. Jalapeño sauces are usually the mildest available, followed by sauces made from cayenne and red chilies. Sauces made with Tabasco peppers (such as the famous Tabasco® sauce) are hotter than jalapeño and cayenne sauces. Unlike some other hot sauces, Tabasco brand sauce is aged in casks before bottling, similar to wine. Habanero sauces rank among the fieriest, and are to be used with caution unless you’re a hot sauce veteran.

The staining ability of hot sauce is greatly affected by the recipe, particularly when ingredients such as tomatoes or carrots are added. Most Mexican-style hot sauces focus on the flavor of the pepper, so there is very little vinegar or other ingredients. In the United States, the primary ingredients of hot sauce are chili peppers, vinegar and salt. Some milder sauces also include tomato sauce to dilute the heat of the peppers. Asian chili sauces are more of a thick paste, or they are made by infusing the peppers in oil or brine.

Because peppers are organic and water-based, hot sauce stains should be removed the same way you would handle any tomato or red sauce stain. First, remove the shirt and run it under very hot water for several minutes. This will flush away most, if not all, of the stain. If a stain is still visible after several minutes of flushing, try rubbing it with a bit of dish soap or liquid laundry detergent, then let the stain soak for a half-hour. Follow with hot water flush. Repeat until the stain is gone, then run the shirt through your usual laundry cycle.

If the hot sauce ingredients include oil, it is also a good idea to soak the stain in a laundry treatment such as Shout or Oxyclean prior to washing to dissolve the oil. Never run stained clothing through the dryer as this will cook the stain into the fabric, making it nearly impossible to remove.

Sharpie

Will a Sharpie Leak Colors from the Fabric When I Wash It?

Sharpie

Many people use Sharpies to mark their clothing or other item that must be washed. The ink is labeled as being waterproof, making it seem like the perfect ink to use on clothing. It is often used on write a person’s name on the tag to keep the clothing from being mixed up. It is also used to decorate the cloth portion of clothing to create a unique design or lettering. However, the meaning of the waterproof designation is often misunderstood, leading to some misconceptions about the pens and their ink.

The Waterproof Sharpie

Sharpie does advertise its ink as being waterproof. However, this does not mean what many people believe it does. It cannot be washed without expecting the ink to fade eventually. The waterproof guarantee that Sharpie promises actually refers to the ink being used for writing on sturdy paper.

The Sharpie website further explains that in the ink industry, the waterproof promise means only that writing done with the ink can still be read after the writing has been exposed to water. It does not mean that the writing won’t bleed a little or that it won’t fade. It also doesn’t mean that a Sharpie won’t fade in the wash or that the ink won’t eventually leak if an item is washed.

Sharpies come with packaging that says that the pens aren’t made to be used on cloth. This is because the ink is a solvent-based ink. Because of its chemical makeup, it may leak through cloth easily the way it does through thin writing paper. It is also discouraged on cloth because there are several effects that can happen once the marked cloth is put into the wash, and those effects aren’t limited to just the garment.

Washing Sharpie Ink

According to the company, Sharpie ink that is placed on cloth will eventually fade when it is washed. They also say that the ink can bleed when washed and that it may eventually develop a yellow halo. This halo develops around the ink, resulting in discolored cloth and a ruined design. And because the ink can bleed form the fabric, it is possible for the ink to leave the cloth in small amounts and to stain other items that are being washed in the same wash load.

Fading Ink

While the ink can bleed in the wash, what many people are concerned with is the level of fading that can occur. The ink is not guaranteed to last through washing, and eventually it will become illegible. For this reason, Sharpie ink is not a reliable way of marking clothing that will be washed repeatedly

To get ink that can be washed again and again without the ink fading significantly and without the yellow halo appearing on the cloth, there are markers that are specifically designed for marking clothing. These markers are made to last through washing without bleeding or fading. They can be used for marking tags or for creating designs and lettering on the cloth itself.

Wrinkle

How To Make Your Own Wrinkle Release Spray

Wrinkle

Wrinkle release sprays are relatively new to the market and are definitely a hit. They allow people to avoid ironing many items of clothing. They are also ideal for getting rid of wrinkles when travelling, so clothes that have been packed are ready to wear and looking great in no time. Wrinkle release sprays are simply sprayed onto the item of clothing and then wrinkles are smoothed out by hand. Once the item is dry, voila, you will have wrinkle-free clothing quickly and easily.

Lots of people search for a way to make their own wrinkle release spray. Many of them want to try it before they buy it. They don’t believe new things that sound too good to be true can actually work. Others love the idea, but don’t want to spend the money to purchase it. Still others just want to cut costs any way they can. No matter what the reason, you will find that making your own wrinkle release spray is very easy and economical to do.

For this interesting experiment, you will need some supplies before you can get started. A small water sprayer bottle that has a fine mist nozzle is absolutely essential. You will also need distilled water and liquid fabric softener. To make the spray, you simply mix one teaspoon of fabric softener in one cup of distilled water and combine it well. Pour the mixture into the spray bottle.

To use your new wrinkle release spray, simply shake up the bottle to make sure it is still well-mixed and spray it generously onto the shirt or other garment that is wrinkled. Pull and smooth out any wrinkles you see in the item of clothing while it is hanging and leave it to dry. When dry, it will be wrinkle free and looking its absolute best.

Pool chlorine

Does Pool Chlorine Damage/Bleach Clothing?

Pool chlorine

Many people are reluctant to wear clothing into a pool or take pains to rinse their clothing out immediately to avoid any damage from the pool chlorine. Many people also worry about their swimwear holding up to the chlorine in the pool.

Pool Chlorine

Chlorine is added at low levels to pool water to keep bacteria from growing in the water. It is also added to drinking water for the same reason. In general, any water that comes into contact with the clothing, with the exception of ocean and lake water, will have chlorine in it. While chlorine does bleach and damage clothing over time, it is used in small enough amounts in a swimming pool that the effects won’t be seen for some time.

Chlorine Levels

The standard amount of chlorine that is added to a pool is calculated in parts per million. The measurement for a pool will generally be around 1 to 10 parts of chlorine for every million parts of chlorine. When something is bleached in the washing machine with a clothing bleach, the general guideline is a bleach level in the washer that is a little more than 80 parts per million. This is a far faster way to bleach and damage clothing than exposing the clothing to chlorine bleach in a pool.

The level of chlorine in drinking water is generally less than one part per million, making the water in the washing machine another slow contributor to damage to clothing. Many washes in a washing machine will have the same effect on clothing because of the chlorine content of the water- it simply happens more slowly because of the lower chlorine content.

Bleaching Effect

Because a pool does have higher levels of chlorine than household water, repeated exposure of clothing to pool water will result in damage and lighter clothing colors eventually. Rinsing out items of clothing after they have been in a pool will not remove the chlorine, but it will result in less chlorine in the clothing.

However, once the clothing has been in the pool water, the bleaching action of the chlorine on the clothing has already taken place. Rinsing it will not reverse the effects that the chlorine has already had on the clothing. It may help the clothing by removing the body oils that get on clothing, resulting in as much or more damage than chlorine.

Bathing Suits

Because bathing suits take a lot of abuse in swimming pools, they are made of sturdy fabric that is made to resist some of the wear that bathers put it through. There are also a number of swimsuits on the market that are specifically made to resist the effects of chlorine. These chlorine-resistant suits are made to keep their color and thickness longer than regular swim suits.

These suits may also see the effects of chlorine eventually, but that damage will be slowed down. This can result in a suit that looks better for more than one or two seasons.

Fray

Why Do Clothes Fray?

Fray

Frayed jeans, tops, elbows and hems are amongst the absolute most stylish looks today, especially amongst the younger set. Kids pay big bucks for outfits that look like they are worn out. However, many of us, especially anyone older than 30, don’t want the frayed look and are frustrated when we find that our favorite clothing has begun to fray. We spend money on a variety of products that are designed to stop fraying clothes. We sew new hems in order to prevent further fraying and use other techniques as well. So what exactly is fraying and why do clothes fray?

Typically clothes fray because there is a cut end of the fabric used in making the clothes that does not have a hem or some sort of fray treatment to keep it from unraveling. Basically the weave of the fabric is unprotected, so it starts to undo itself. Whether or not it frays quickly or not depends on many things, like the use of the clothing, the age of the clothing, the quality of it and the tightness of the weave.

Wear and tear can cause fraying, sometimes much to the delight of those who like the worn look. Cutting a T-shirt or other item of clothing for deconstruction or reconstruction purposes is a sure way to achieve some much-wanted fraying, Those strategic cuts will expose the weave of the cloth and make it vulnerable to fraying. This often gives a strategic kind of look of unfinished hems, see-through holes and more. For the young person into this look, strategic fraying is just what they want.

If you love the look of frayed clothes it is quite easy to take even new items and cause them to fray. A pair of scissors and a run through the washer and dryer will do it for many items. For people who dislike frayed clothes, extra care of their attire is needed. Be sure to pay attention to hems, especially if pants hems are a little too long and get extra wear from the ground. Repair clothing at the first sign of holes or fraying. Use fray check on edges of fabric to avoid fraying. Replace items that cannot be salvaged.

Get started today with your new frayed look and be proud of it. Know that you are on the cutting edge of style amongst young people. Fraying is cool and anybody can do it or let nature do it for you.

Chocolate milk stains

How to Remove Chocolate Milk Stains

Chocolate milk stains

Those of us who don’t like chocolate are few and far between. The amazing taste of the cacao bean was discovered 2,000 years ago in the rainforests of the Americas. The ancient peoples of Mexico and Central America mixed the ground beans, found in the pods of the cacao tree, with other seasonings to make a frothy and somewhat bitter drink. Drinking chocolate was an important part of the lifestyle of these civilizations, much as coffee drinking is to modern times. Spanish conquistadors took the drink back to Europe, where it quickly became a favorite, so much so that native Americans and Africans were enslaved to farm and produce the beans. Over time, other concoctions using cacao were created. The popularity of the chocolate flavor gradually spread throughout the world, evolving into new textures and items that are now enjoyed by countless numbers of people.

The creation of chocolate milk is credited to Sir Hans Sloane, a British physician and collector. That gentleman discovered chocolate while practicing medicine in Jamaica in 1689. There the locals drank cocoa mixed with water. The good doctor is said to have found the drink disgusting, and devised a way to mix cocoa with milk to make the taste more pleasant. Upon returning to England, Sloane brought his recipe with him, and it was later dispensed by apothecaries for medicinal purposes. By the 1800’s, tins of Sloane’s “drinking chocolate” were being sold by the famous Cadbury brothers.

Chocolate milk is one of those simple pleasures in life that can be enjoyed by young and old alike. It can also cause major problems if it happens to come in contact with your favorite white shirt or little Johnny’s best khaki dress pants. This is because milk contains natural lactose sugar and fats, while chocolate syrup contains sugar and cocoa powder (with cocoa butter proteins). When combined, these two create a powerful stain punch.

To combat a nasty chocolate milk stain, move quickly. Grab some paper towels to blot up the excess and try to prevent a larger stain. Keep pressing a clean towel against the fabric to pull out as much moisture as possible. Next, wet a sponge with cold water (it’s very important that the water temperature be cold, otherwise you will help to set the stain) and wipe the wet stain over and over. Blot with a clean paper towel, and repeat.

Because milk and chocolate are organic, they should not be cleaned with chemicals and other non-organic cleansing agents. This will actually “cook” the stain onto the material, making removal much more difficult, if not impossible.

Another trick is to use a bit of lemon juice. Sprinkle the juice on the stain while the fabric is wet, then lay it in the sun. The juice and sun will work together to lighten and brighten stubborn organic stains. This will not be as effective if the stain is old or has been treated with chemicals which cooked it into the fabric.

Now even if the chocolate milk wins, you can rest easy knowing you’ll soon be able to get your stain-free groove on.

Hang dry

Tips To Hang Dry Your Clothes And T-Shirts

Hang dry

Following laundry instructions as they are printed on the tags of clothes, including T-shirt often means that you end up hanging them to dry. Some people have a love of hanging clothes to dry outside and do so during all 4 seasons. Still others simply like to hang clothes inside to dry, in order to save on laundry costs or to avoid shrinkage. Whatever the reason you choose to hang dry your clothes and T-shirts, there are some things to keep in mind.

•    Hang clothes in an area where air circulates freely. If you hang them outside, this is easily done. However, for clothes hung inside it is important to space them apart and allow air to flow around them. This reduces the chance of mold and speeds up the drying process.

•    If you are using clothes pins or clips of some sort, pin them on a part of the clothing that will be least affected if they leave an indentation. A good choice for pants is the waistband. A good choice for T-shirts is the hem, especially if you plan to tuck in the tee.

•    Also if you pin up your clothes to dry, be sure to use enough pins to make sure the wet item does not stretch and sag disproportionately while drying. Pinning just the end of clothes made out of absorbent cotton, like T-shirts, often results in stretched out ends when the item is dry.

•    For clothes that are hung outside to dry, it is important to make sure you are not putting them there during high pollen count season if you have an allergy sufferer in your house. It will affect his or her allergies greatly.

•    Another thing to remember about outside drying is that the sun has a natural bleaching effect on clothing. Therefore white tees and clothes will look great dried outside, while color clothes will fade more quickly from drying outside.

•    For the best look possible from a line dried item, pull and tug out wrinkles as you are hanging it, restoring it to its intended shape. This will also save ironing time.

Hair dryer

How to Use Your Hair Dryer to Quickly Dry Your Clothes

Hair dryer

A hair dryer can be used to dry plenty of things besides just hair. A hair dryer is a very useful instrument for taking care of clothing of all types, and anyone who has experienced an inconvenient spill or has waited for an item of clothing to dry shouldn’t be without one.

Just about any fabric can be spot cleaned to remove a stain before it sets into the fabric. You may have experienced a spill on an outfit just before you were about to head out the door. To get the spill out of the fabric, it had to be spot cleaned right away, but you knew you wouldn’t have time to put the clothing into the dryer before leaving. It’s happened to everyone, and changing the outfit or walking out with a wet spot seem like the only options available. However, many people haven’t considered how handy their hair dryer can be at these times. A hair dryer can be used to spot dry the area that was spot cleaned, making a change or running out in wet clothing unnecessary.

Using a hair dryer to dry these items will allow you to concentrate the air on one area, taking far less time to dry the item and putting it in a dryer. Although it’s tempting to blow dry an item while you’re wearing it, it will dry faster if you take it off first. Hang the item up if possible and blow dry it so that the air flows through the fabric. This will dry the fabric far faster and you will be able to put on the item in just minutes.

There are plenty of other times when a hair dryer can come in handy to dry clothing as well. There are many delicate fabrics that were not supposed to be put through a dryer. Many people wash their delicates such as lacy underwear, bras and pantyhose and then hang them up to dry. Hanging them up to dry can take hours for them to dry enough to be worn. This can be an inconvenient waiting period for anyone who needs to put on these things but can’t risk putting them in the dryer.

Like other clothing, it’s best to hang up these items when using a hair dryer on them. You can hang them over a hanger or a shower rod to make things easier. Then, hold the hairdryer several inches away from the item to ensure that you don’t damage the fabric. For delicate items, it’s best to use a cool setting on your hairdryer if it has one. If not, move the hairdryer back and forth so that no one area gets too much heat. This will dry larger areas faster while not burning any of the delicate fabric. If you have a focusing tip that you can place on your hairdryer, this can be helpful as well for blow drying smaller items. However, a diffuser would take away the effectiveness of the hairdryer by limiting the amount of air that it puts out.

How Many Times Can You Wear A T-Shirt Before Washing It.

Everyone tends to have their own schedule of wearing clothes for a certain period of time before washing them. Some items can easily be worn more than once, depending on the type of clothes, where you wear it and what you do while wearing it. In the case of a T-shirt, typically they are washed after each use. However, in reality there are several variables, which can affect this. So in order to determine whether or not you can wear a T-shirt again before washing it, weigh the following factors.

•    If the T-shirt was worn next to the skin, you may not be able to wear it a second time before washing it. If you layer your T-shirts, the one on the outside will not be exposed to the oils and perspiration of the skin and will remain clean enough to be able to be worn more than once before needing to be washed, providing you don’t get it dirty in other ways.

•    How long the T-shirt was worn also determines whether or not you can wear it multiple times before washing it. If you put on a T-shirt and wore it for just a few hours, you may be able to wear it another time or two for a similar time period before needing to wash it.

•    What you were doing while wearing the shirt will help you decide if you need to wash it after one wearing. If you wear a T-shirt while sitting around watching TV or doing computer work in a climate controlled room, you should be able to get a second wearing out of it. However, if you wear it to the gym, outside, while doing exercise, while cooking, in an environment that has a strong odor or while doing dirty work, you will not want to wear it again until you have washed it.

•    The fit of a T-shirt helps to determine the frequency of washes. If your T-shirt is form fitting, it is more likely to pick up oils and odors from your skin and will need to be washed more often. If your T-shirt is loose fitting and barely skims your torso, it may be one that you can wear twice before needing a wash, depending on the other factors above also.

If you have a favorite T-shirt or one that you need to wear repeatedly for some reason, you can save yourself from having to do laundry everyday by following a few simple tips to make sure you get the most use of your tee between washes. Wear it only when you need to and for as short a time as possible. Put another solid colored T-shirt under your favorite one. Restrict the activities you do and the places you go while wearing it. You can also buy a duplicate T-shirt to make sure one is available when you need it.

Get a custom-made T-shirt printed to duplicate your often-worn T-shirt. Custom printed T-shirts can replicate practically any T-shirt, so you have exactly what you want on your shirt and have the quality, cut and style of T-shirt that you want too.

How To Clean Fake Tan Moisturizer On Your T- Shirt?

There is nothing worse than getting ready to go out and discovering that the T-shirt you intended to wear has a stain. Inevitably, it is a stain that requires a great deal of work to get out and should be attended to immediately. While no stain should be left to set in, some stains are worse than others and need extra attention. Fake tan moisturizer is one of those stains.

Stains resulting from the use of fake tan moisturizer have both color and grease to contend with in terms of getting rid of the stain, not the easiest combination to deal with. The first thing to do is to make sure you have no more moisturizer on your hands or any other part of your body that may touch the T-shirt so you will not make the stain worse. Turn the T-shirt inside out and work on removing the stain in this way so that it can lift off rather that go through the fabric.

Take a light colored absorbent cloth and lay it beneath the stain so that it does not transfer onto another part of the tee while you are working to get rid of the stain. Next use a dry paper towel laid gently over the stain to get the worst of it absorbed before you begin treating what is left.

Apply a clear dish detergent, that is designed to fight grease, mixed with water and dab gently at the stain. If this does not remove the fake tan stain, use hydrogen peroxide and attempt to gently spot clean it. Test treat an inconspicuous spot first to make sure the peroxide doesn’t damage the shirt. You may also want to try glycerin to help remove the stain. When the stain is successfully gone, wash it as usual.

If you cannot get the stain out, add a pretreatment to the other things you have put on the stain and let it sit. Then wash as usual. Do not dry the item until it is stain free or you will be out of luck and have a permanent stain on your hands.

If you find yourself with a T-shirt ruined by a fake tan moisturizer, there is help for you. Choosing to replace the T-shirt with a brand new custom-made one is definitely the way to go. By getting a custom-made tee you can either totally recreate the shirt you have ruined or you can design one that you like even more. You get to choose the color, style, neckline, sit, fabric weight and quality of the T-shirt you are buying. Then to make it even better you can select a design to have printed on it to totally personalize it.

The list of fun T-shirts you can have made include one that says “This is my official self-tanning T-shirt” with fake stains all over it. Such a T-shirt could really come in handy. You can also print lines like one of these on a custom shirt:
–    Smart Girls Fake It
–    I’d rather be sunless tanning
–    Sunless tanning means no tan lines

Get your custom-made fake tan T-shirt today and don’t worry about stains.

What are the Differences Between Washing Cycles?

If you have clothes to wash, you need to know the difference between the various washing cycles. By using the wrong washing cycle, you can wear out your clothes far faster than is necessary. You may also ruin some clothes that aren’t made for washing on certain cycles. By using the right washing cycles, you can extend the life of your clothes and keep them in better condition. You can also save time and money by using the shortest cycle that will work with your clothing type.

Short Cycle Wash
Most washing machines have a short cycle wash. This short cycle is a good way to wash clothes that are only slightly dirty or that have a lot of embellishments on them that should be washed gently. It’s good to use slow cycles as well for these types of clothing. A long, vigorous wash wears down the fibers of clothing. If you are washing a delicate fabric, use the short cycle and use cold water. If you are washing cotton and you are trying to avoid shrinkage, use the short cycle on cold as well.

Regular Wash Cycle
The regular wash cycle will agitate the clothing and spin it at a faster rate of speed than the shorter cycle. The regular wash cycle is good to use on clothes that are very dirty or that are thick and sturdy. The regular cycle works well with jeans, t-shirts, coats, bedding and any other items that don’t need any delicate treatment. Clothing that is very dirty or that has a bad smell is also in need of the regular wash cycle.

Permanent Press Cycle
The permanent press cycle is a cycle that is a bit easier on fabrics. For many average loads with clothing that is not extra dirty, the permanent press washing cycle is a good choice. This washing cycle cools clothes before they entered the spinning cycle. This is what prevents certain fabrics from getting creased or wrinkled during the washing process. It is particularly effective with synthetic fabrics and permanent press items. Clothing that is advertised as wrinkle-resistant should be washed in a permanent press cycle. For loads full of moderately dirty clothes that do not have foul smells, the permanent press cycle will play them without any unnecessary wear to the fabric.

Delicate Washing Cycle
For many fabrics, the delicate washing cycle is the only one that will work well. There are many items that are simply not made to be washed in a washing machine. There are some silks that are dry clean only, as are some items that are embellished with a lot of sequins or other items. However, there are many delicate items that can be washed in the delicate cycle. Items such as lingerie, items with a lot of lace, very delicate lightweight items, and fabrics that are loosely woven are all perfect for the delicate washing cycle. With delicate items, use cold water and a delicate detergent. This cycle washes clothing more gently with slower agitation and spinning. It is the closest thing to hand washing that is possible with a washing machine.